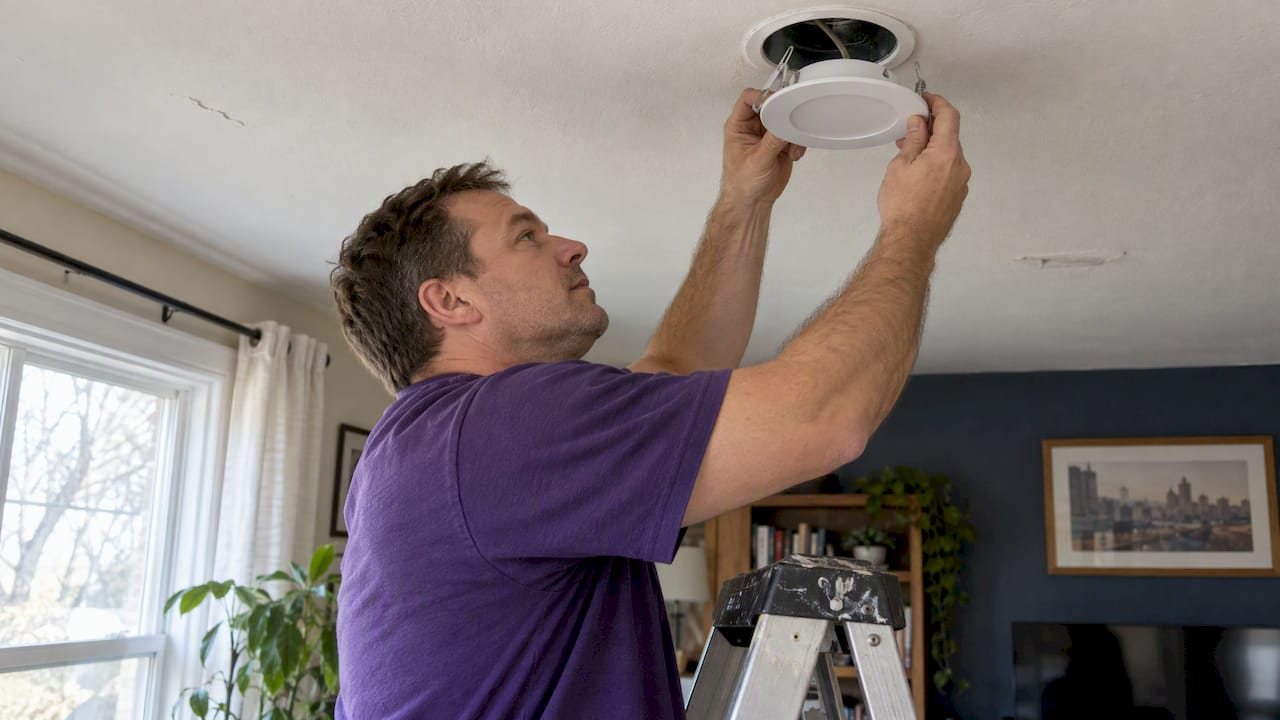
Most recessed lights can be effectively air sealed to prevent energy loss and improve home comfort. For many homeowners, the fastest solution involves installing an ENERGY STAR-qualified LED retrofit kit with a foam gasket, complemented by a bead of caulk around the trim. Non-IC rated fixtures, however, require a sealed fire-rated enclosure on the attic side to ensure safety and compliance. Building America research indicates that a non-airtight can with an incandescent bulb can draw three to five times more air through its gaps when the light is on compared with off, highlighting the significant impact of these leaks.
Yes, most recessed lights can be meaningfully air sealed, and for many homeowners the fastest fix is an ENERGY STAR-qualified LED retrofit kit with a foam gasket, paired with a bead of caulk around the trim. Non-IC fixtures need a fire-rated attic-side enclosure instead. If you find damaged wiring, several old non-IC cans, or signs of attic moisture, bring in an electrician or insulation contractor rather than working around those problems yourself.
TL;DR:
- Check ratings first: IC fixtures can be covered with insulation, but unrated cans need a sealed fire safe enclosure and 3 inches of clearance.
- For IC or ICAT fixtures, choose an ENERGY STAR qualified LED retrofit kit with a gasket, then caulk trim gaps; caulk alone seals less reliably.
- Turn off the breaker and confirm power is off with a noncontact voltage tester; stop and call an electrician for brittle, overheated, or loose wiring.
- After sealing, repeat the smoke check and attic light test; a blower door test can measure air leakage throughout the house before and after.
- Call a contractor if several fixtures lack IC ratings, the attic shows moisture or mold, or access feels too tight or unsafe.
Table of Contents
- Quick checklist: safety, tools, and decision points before you start
- Why recessed lights leak: the physics and common leak paths
- How to inspect and diagnose leaking recessed lights
- Interior-side fixes: retrofit LED kits, gaskets, and trim caulking
- Attic-side solutions for non-IC fixtures
- Safety and code notes: IC/ICAT ratings, ASTM E283, and clearance rules
- How to verify the seal and when to call a professional
- Long-term durability and maintenance of air sealing solutions around recessed lights
- Common mistakes and troubleshooting tips when sealing recessed light air leaks
- Practitioner perspective: DIY vs hiring an attic air-sealing specialist
- If you prefer a pro: how The Attic Genius solves recessed-light air leaks
- FAQ
- Sources
Quick checklist: safety, tools, and decision points before you start
Before touching any fixture, shut off the circuit at the breaker and confirm it is dead with a non-contact voltage tester. Wear safety glasses and gloves, and make sure your attic access point and walking boards are solid before you climb up with tools in hand.
Gather your materials first so you are not climbing up and down the attic ladder twice:
- A smoke stick or stick of incense to trace air movement around trim edges.
- Acrylic-latex caulk for interior trim and fire-rated mastic or caulk for attic-side seams.
- Foil-faced HVAC tape, a retrofit LED kit with a gasket, and low-expansion canned spray foam.
- A flashlight, sturdy ladder, and a phone camera to document fixture type and any existing damage.
Identify whether each fixture is IC-rated, ICAT-rated, or neither before you decide on a fix, since that single detail determines which repair path is safe.
Why recessed lights leak: the physics and common leak paths
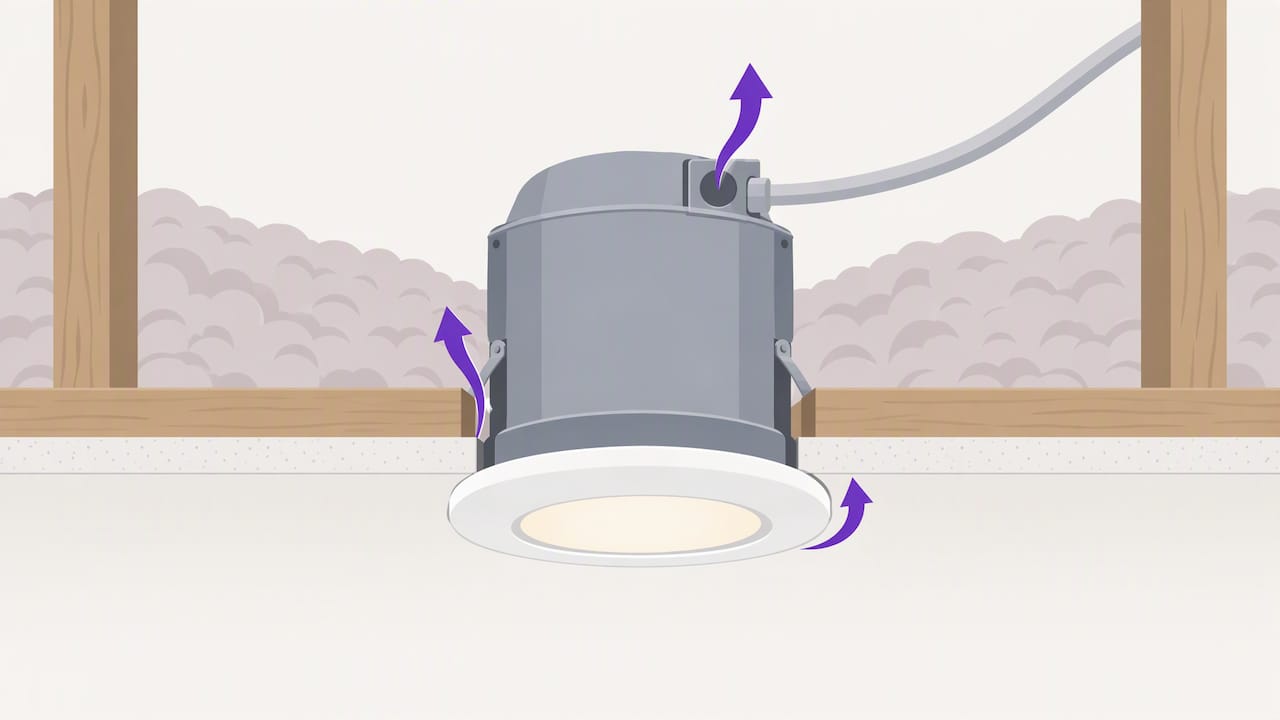
A recessed can cuts a hole straight through your ceiling into the attic, and heat from the bulb pulls air upward through every gap in the housing. Building America research found that a non-airtight can with an incandescent bulb can draw three to five times more air through its gaps when the light is on compared with off, a stack effect that turns the fixture into a small chimney.
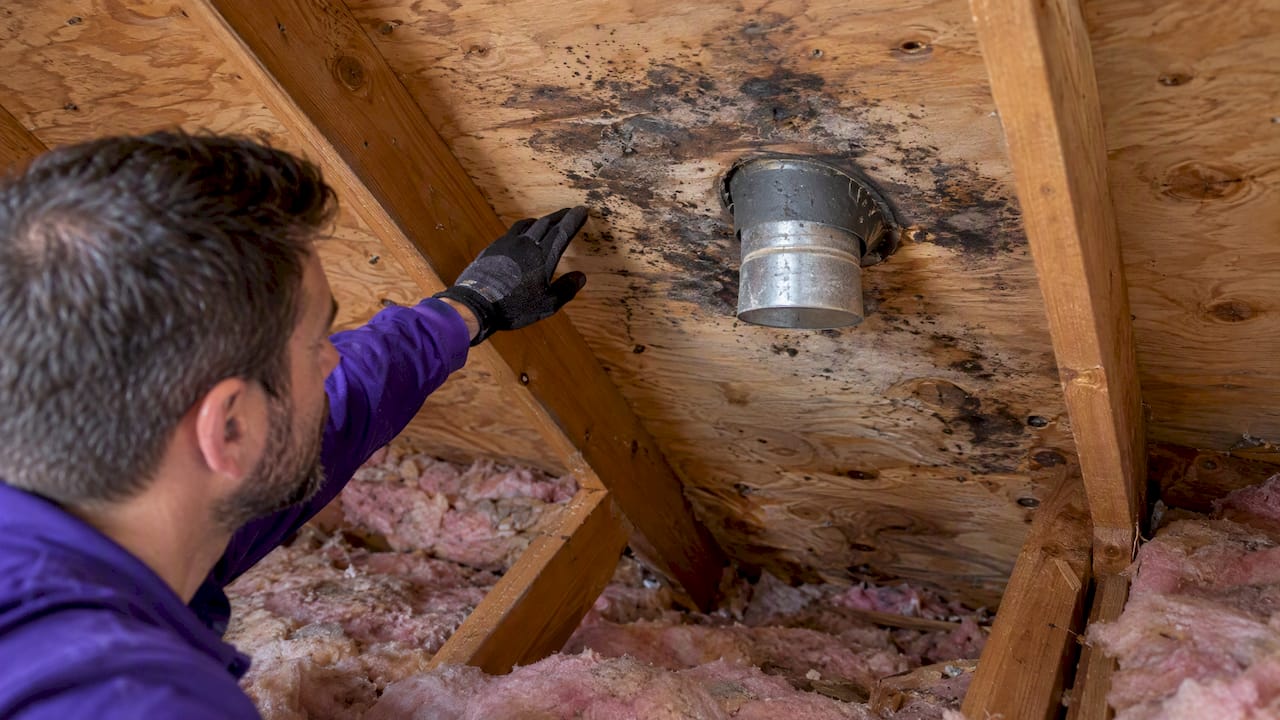
The air finds its way out through predictable paths: the gap between the housing and the drywall, factory knockouts and wiring penetrations in the can itself, and the seam where the trim ring meets the ceiling. Over a heating season, that steady airflow does more than waste energy. It carries moisture-laden indoor air into the attic, where it can condense, feed ice dams along the roof edge, and promote mold on the underside of the sheathing. Insulation piled on top of a leaky can does little to stop any of this, since insulation slows conducted heat but not moving air.
How to inspect and diagnose leaking recessed lights
Start inside the living space on a cold or windy day. Run your hand around the trim edge to feel for a draft, then hold a smoke stick near the same spot and watch whether the smoke bends toward the fixture.
From the attic, a few checks confirm what you felt downstairs:
- Turn the room lights on, then go up and look for light escaping around the can body or trim, since any visible glow marks an open gap.
- Check the insulation near each fixture for dark, dirty streaks, which show where infiltrating air has been filtering dust through the fibers.
- Inspect the junction box and the top of the can for open knockouts or loose wire connectors that let attic air pass straight through.
A blower door test or an infrared scan goes further, pinpointing the exact fixtures with the worst leakage and letting you compare results before and after sealing. These tools are usually worth hiring a professional for, since they require calibrated equipment and the readings matter most when documented by someone who tests houses regularly.
Interior-side fixes: retrofit LED kits, gaskets, and trim caulking
For IC-rated and ICAT fixtures, an ENERGY STAR-qualified LED retrofit kit is the highest-impact, lowest-risk fix available to most homeowners. The Building America Solution Center notes that these kits typically include a foam gasket that seals the trim against the ceiling, and because they run far cooler than incandescent bulbs, they reduce the heat that drives stack-effect airflow in the first place.
Work through the installation in order:
- Shut off power at the breaker and confirm the circuit is dead before removing the old trim.
- Test-fit the new retrofit kit and check that the gasket compresses evenly against the ceiling with no visible gaps.
- Run a bead of acrylic-latex caulk around the trim perimeter if the gasket alone does not close every edge.
- Turn the light back on and check from the attic that no light or airflow escapes around the can.
Caulk alone can hold on a tight-fitting, already-airtight housing, but a gasketed retrofit trim plus caulk outperforms caulk by itself on older or warped trims. Because LED retrofit kits commonly last many thousands of hours, providing a long-lasting seal, the seal you create this way tends to stay intact for decades without needing to be redone.
Pro Tip: Keep the box or label from your retrofit kit. If a fixture ever needs service, matching the exact gasket profile saves a second trip to the hardware store.
Attic-side solutions for non-IC fixtures
Non-IC fixtures cannot have insulation resting against them, so the fix has to come from the attic side. Building America guidance recommends building a fire-rated, sealed enclosure around the can that keeps insulation at least 3 inches away on all sides while closing off the air leak path completely.
Steps that keep the job safe:
- Pull back insulation around the fixture before building anything, so you have clear access to the can.
- Build the enclosure from fire-code gypsum board or sheet metal, sized to clear the housing by at least 3 inches.
- Seal every seam with fire-rated caulk or mastic, and use low-expansion spray foam only where it will not contact the hot housing.
- Let spray foam cure fully, then replace insulation around the enclosure while leaving its top exposed above the insulation line.
| Enclosure material | Typical use | Key requirement |
|---|---|---|
| fire-code gypsum board | Attic-side box around non-IC cans | Minimum 3-inch clearance to housing |
| Sheet metal enclosure | Attic-side box around non-IC cans | Sealed seams, 3-inch clearance |
| Fire-rated caulk or mastic | Sealing enclosure seams | Applied after enclosure is built |
| Low-expansion spray foam | Sealing small gaps near, not touching, the housing | Must not contact hot surfaces |
Replacing old non-IC fixtures with ICAT-rated units during your next lighting update removes the need for an enclosure altogether and is the better long-term fix.
Safety and code notes: IC/ICAT ratings, ASTM E283, and clearance rules
IC-rated fixtures are built to be safely covered by insulation, while ICAT fixtures add an airtight rating on top of that. The airtight label is based on ASTM E283 testing, which requires leakage of 2.0 CFM or less at 75 Pascals in laboratory conditions, though ENERGY STAR guidance points out that the label describes the housing, not necessarily how well it was installed.
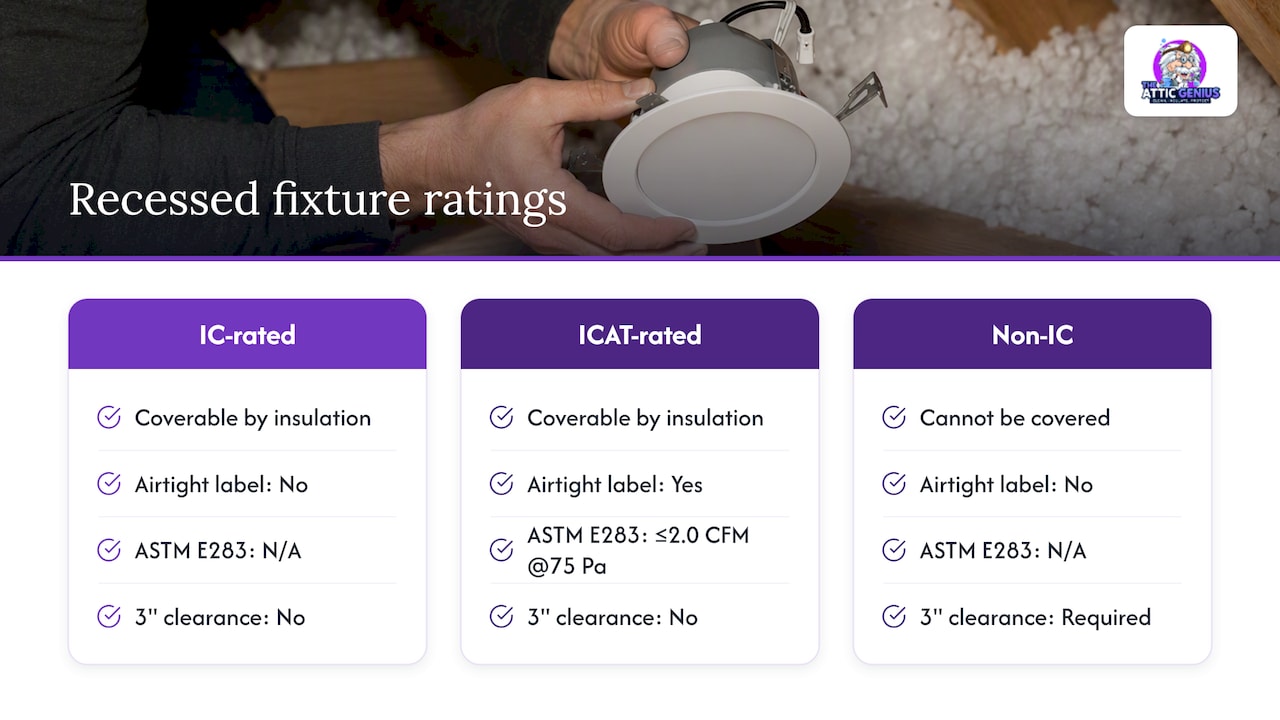
Non-IC fixtures always need that 3-inch insulation clearance, no exceptions, and manufacturer instructions and your local electrical code take priority over any general advice here. Never enclose a non-IC fixture without first switching to low-heat LED bulbs, and call an electrician whenever wiring looks brittle, overheated, or improperly connected.
How to verify the seal and when to call a professional
Once you finish sealing, repeat the dark-attic light test and the smoke-stick check to confirm the gaps are closed. An infrared camera can reveal temperature differences around the fixture that your eyes and hands miss.
For a more rigorous read on results, a professional can run:
- A blower-door test to quantify the change in whole-house air leakage before and after your work.
- Pre- and post-sealing photos and readings that document the improvement.
- A moisture inspection if you noticed condensation or any sign of mold before you started.
Call a professional when you spot damaged wiring, when several fixtures are non-IC and need enclosures, when the attic already shows moisture or mold, or when your attic access is too tight or unsafe to work in comfortably.
Long-term durability and maintenance of air sealing solutions around recessed lights
A properly sealed recessed light does not need ongoing attention the way weatherstripping or caulk around a window does. LED retrofit kits typically have a very long lifespan, so the gasket and caulk you install tend to stay in place for the life of the bulb without being disturbed by frequent trim removal. That longevity is one of the quieter advantages of switching away from incandescent cans: fewer trips up the ladder, fewer chances to disturb a good seal.
Caulk itself can dry out, crack, or pull away from the ceiling over many years, especially in a home that settles or experiences temperature swings. A yearly glance during your furnace filter change is enough to catch a cracked bead before it reopens a real leak. Attic-side enclosures hold up well as long as the fire-rated material was not punctured when insulation was added back around it, so it is worth a quick visual check the first time you’re in the attic after a new insulation job.
Spray foam used around enclosure seams can shrink slightly as it ages, so a fully cured, low-expansion foam job from the start matters more than how it looks on install day. If you ever replace a fixture or run new wiring, treat that as a chance to re-check the seal rather than assuming the original work still holds, since any disturbance to the trim or enclosure is the most common way an old leak reopens.
Common mistakes and troubleshooting tips when sealing recessed light air leaks
The most frequent mistake is treating insulation as an air seal on its own. Piling more insulation over a leaky can muffles some heat loss but does nothing to stop the airflow driving it, and ENERGY STAR guidance is direct about this: seal first, insulate second.
A second common error is enclosing a non-IC fixture without checking bulb type first. A hot incandescent bulb inside a sealed box is a fire risk, so always switch to low-heat LEDs before building or closing any enclosure. People also reach for high-expansion spray foam near a can light, not realizing it can swell against the housing and create pressure or heat contact that the fixture was never rated for. Low-expansion foam, used carefully and never touching the can itself, avoids that problem.
On older fixtures, brittle plastic clips or a warped trim ring can keep a new retrofit kit from seating flush no matter how well you install it. If the trim rocks or the gasket won’t compress evenly, the fixture itself needs replacing rather than another layer of caulk. Finally, skipping the after-the-fact check is a mistake that undoes the whole project: without a light test, smoke check, or infrared scan afterward, there is no way to know whether the seal actually closed the gap or just covered it.
Practitioner perspective: DIY vs hiring an attic air-sealing specialist
A single room with ICAT-ready fixtures is a reasonable weekend project for most homeowners. A house full of old non-IC cans, or any sign of attic moisture, usually calls for a contractor who can document results and carry liability for the electrical work. Prioritize the biggest penetrations first: a handful of leaky cans often matters more than dozens of small gaps elsewhere. Professional work also comes with something a DIY fix can’t: a written warranty behind the result.
— Jim
If you prefer a pro: how The Attic Genius solves recessed-light air leaks
Sealing recessed lights is often one piece of a bigger attic air-sealing picture, and we handle that whole picture rather than just one fixture at a time. When we come out for air sealing, we address recessed light penetrations alongside other attic bypasses, build fire-rated enclosures where fixtures require them, and top up insulation afterward so the fix holds.

Here’s what scheduling with us looks like:
- A free inspection, with scheduling available in many cases.
- Pricing details provided before any work begins, with no surprise add-ons.
- A warranty backing the completed work.
If your attic has several non-IC fixtures, signs of moisture, wiring you’re not confident touching, or an access point that makes DIY work impractical, that’s exactly the kind of job worth handing off. Request a free inspection and we’ll give you a straight answer on what it takes to get your recessed lights, and the rest of your attic, properly sealed.
FAQ
Can you seal recessed lights?
Yes, most recessed lights can be sealed, either with an ENERGY STAR-qualified LED retrofit kit and gasket from inside the room or, for non-IC fixtures, a fire-rated enclosure built from the attic side. The right method depends on whether the fixture is IC-rated, ICAT-rated, or neither.
Why is there moisture coming out of my ceiling light fixture?
Moisture around a recessed light usually means warm, humid indoor air is escaping into a cold attic space and condensing near the fixture. This same air leak path that causes moisture problems is also the one you close when you seal the trim or build an attic-side enclosure.
How can I fix recessed lights that are falling out?
A trim that won’t stay seated usually means the retaining clips have weakened or the trim ring has warped with age or heat. Replacing the fixture or installing a new retrofit kit with fresh clips typically solves this, and it’s worth checking that insulation clearance is correct at the same time.
What rating should recessed ceiling lights have if installed against insulation?
Fixtures touched by insulation need an IC rating at minimum, and an ICAT rating adds an airtight standard tested to ASTM E283 at 2.0 CFM or less at 75 Pascals. Non-IC fixtures must keep insulation at least 3 inches away and typically need a sealed, fire-rated enclosure instead.
Sources
For exact procedures and safety criteria, consult the Building America Solution Center, ENERGY STAR’s DIY guide, and the DOE’s Job Aid 2-5. Always follow your fixture manufacturer’s instructions and local electrical code, and check a duct or blower-door leakage test guide if you want to understand what professional verification numbers mean.
- Measure Guideline: Air Sealing Attics | Building America / DOE
- A Do-It-Yourself Guide to Sealing and Insulating with ENERGY STAR